How to Install a Flagstone Patio
Flagstone patios can look natural and high-end, and are excellent additions to most backyards. However, homeowners who like to take on their own projects might be daunted by the stone, because no two pieces are the same. It is more challenging to install stones that aren’t uniform in shape. Ready to give it a shot anyway? Here is how to install a flagstone patio.
Tools You May Need
- Stakes
- Shovel
- Rake
- Broom
- Level
- A 2×4 or a Screed
- Tamper
- Garden hose
- Line level
- Mason’s line
- Sledgehammer
Materials You’ll Need
- Your flagstone
- Compatible gravel
- Stonedust or Concrete Sand
- Fill material, such as NOCO Sand
Need help with your tools and materials? At Grand Rive Natural Stone, we have all the landscaping products you will need to complete your flagstone patio. Contact us today.
Step One: Outline the Patio
Use mason lines (the lines of string or rope used to measure and plan out your space) and stakes to outline the area where you’d like to install the patio. If you’re making a square or rectangular patio, you’ll need to make sure that the corners are properly squared. To do this, measure diagonally between the corners and ensure that they measure the same. Then you can slope the mason line to aid in the construction.
Step Two: Excavate the Patio
You will now need to dig your base for the patio. Measure the thickness of your flagstone and add six-eight inches. That is how deep you need to dig out the ground beneath your patio. Start by digging around the edges of the patio to the right depth and then dig out the center. Tamp the soil when you’re done. The depth of your base may need to be adjusted depending on the natural drainage of your soil.
Step Three: Lay Gravel and Stonedust
Next, you need to add a minimum 6-inch layer of compactible gravel to the whole area. The gravel needs to be raked levelled and tamped. For best results, do this in two steps, starting with about half, tamping it, and then adding the remaining gravel and tamping it.
Once your gravel base is down, you’ll add your layer of levelled sand or stonedust, and tamp it down as well. Level the surface of your stonedust or concrete sand with your screed or 2×4.
Your entire base should now be compacted and levelled.
Step Four: Organize Your Stones
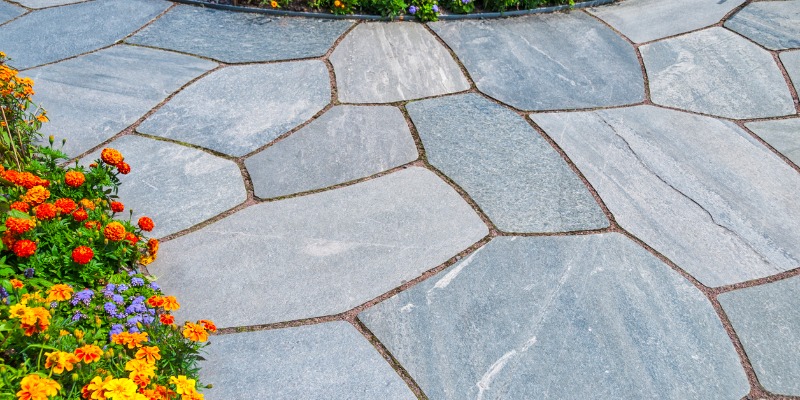
Since random flagstone is, as its name suggests, random sizes and shapes. a laying pattern can be tricky. Start by organizing the stones somewhere nearby -many people choose to do this on their driveway- and lay the stones out and vary the sizes, colours and shapes of stones next to one another. When you have a pattern that you like, you should take a picture of it for future reference. If you’re feeling confident in your skills, you can pull stones and try them in various positions right on your base. Don’t be afraid to break a large stone to make it fit, or to use a small piece to fill an awkward gap.
Step Five: Lay and Level Stones
Next, transfer your flagstone design one stone at a time onto the actual patio. Work from a corner so you can keep the pattern consistent. Try to keep them the same distance from each other that they were when you laid out the patten. This should be a consistent distance. Now level each stone by either adding or removing the stonedust or sand from beneath it.
Step Six: Fill in the Gaps
Wondering how to fill flagstone joints? Just add the fill material of your choice to every joint. Sweep and then use a garden hose to settle it. We recommend NOCO jointing material from Techniseal, as it’s engineered to be used with natural flagstone and is formulated to set up over wide joints.
You can get all of the materials you need for your new flagstone patio at Grand River Natural Stone. Contact our experts, or check out our wide selection of flagstones at one of our locations near you.